Create a 3DS Authenticated Payment
Add an extra layer of security to your transactions and reduce fraud risk by implementing 3D Secure (3DS) authentication. This guide demonstrates how to use the GetNet Global API to verify a cardholder's identity before processing their payment.
Requirements
Before starting the integration, complete the following:
- API Credentials: Contact the Integration Support Team to obtain your
client_idandclient_secret. - Access Token: Generate a Bearer token using your credentials via the Access Token endpoint.
- Card Brand Support: Verify the card brand is Mastercard or Visa. These are currently supported for 3DS in Argentina, Chile, Mexico, Spain, Brazil and Uruguay.
Mandatory for Europe: Transactions within the European Economic Area (EEA) require 3DS authentication to comply with PSD2 and Strong Customer Authentication (SCA). Refer to the Taxes and Regulations documentation for exemption details.
Understanding the 3DS Authentication Process
The card issuer dynamically determines the authentication flow based on risk assessment, card brand, and issuer capabilities. After you initiate enrollment, the API returns a
status field that dictates your next action.Handle the three possible scenarios:
- Direct Authentication: The issuer authenticates the cardholder immediately (status:
AuthenticatedorAttempt). - Challenge Required: The issuer requires interactive cardholder verification (status:
Pending Challenge). Choose between rendering an HTML template or performing a manual POST using the ACS Direct Form data. - Pending Enrollment Continue: The issuer requires additional processing before reaching a final state (status:
Pending Enrollment Continue). This step may ultimately result in authentication or a challenge.
Quick Reference: Decision Flow
Follow this decision logic based on the
status returned by the API:After Step 2 (Initiate Enrollment):
AuthenticatedorAttempt: Proceed to Step 4: Create the Payment.Pending Challenge: Redirect the customer using eitherredirect_html_templateoracs_redirect_form. After the challenge completes, proceed to Step 3B: Validate Authentication, then Step 4: Create the Payment.Pending Enrollment Continue: Proceed to Step 3C: Continue Enrollment.
Implementation Steps
Step 1: Obtain Access Token and Tokenize Card
- Request an access token using your API credentials.
- Tokenize the card information using the token endpoint.
Step 2: Initiate Enrollment
Call the 3DS - Init Authentication endpoint. Include the
extra_fields object with billing address, shipping address, browser details, and customer information to support accurate risk scoring.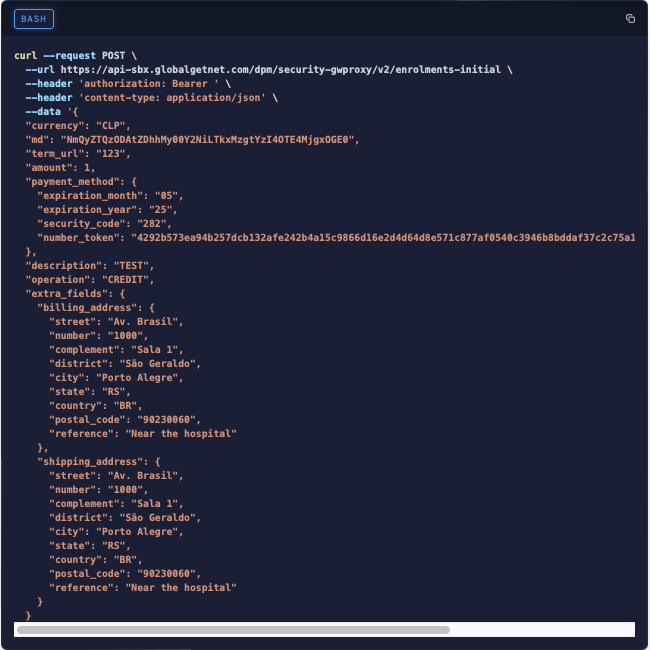
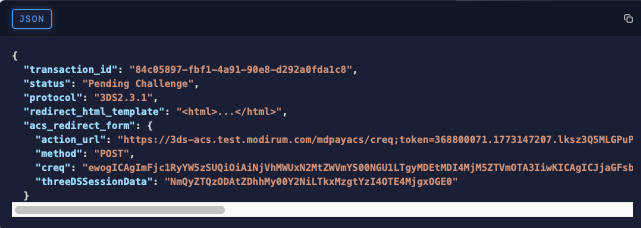
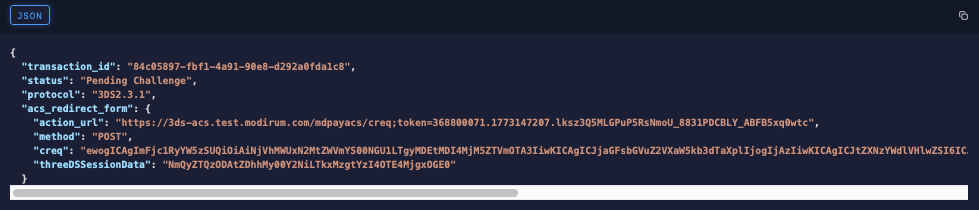
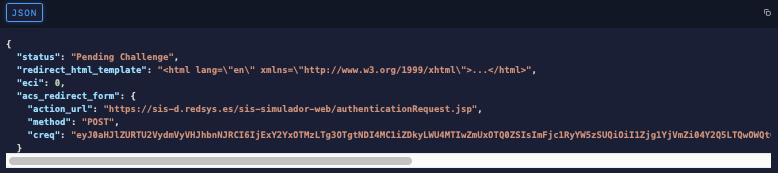
Response example (Pending Challenge):
Step 3: Check Status and Follow the Appropriate Scenario
Status: Authenticated or Attempt
Extract the authentication data (
xid, eci, cavv, ds_trans_id) and proceed to Step 4: Create the Payment.Status: Pending Challenge
Redirect the customer to their bank for authentication. Select one of the following redirection methods:
Option A: HTML Template
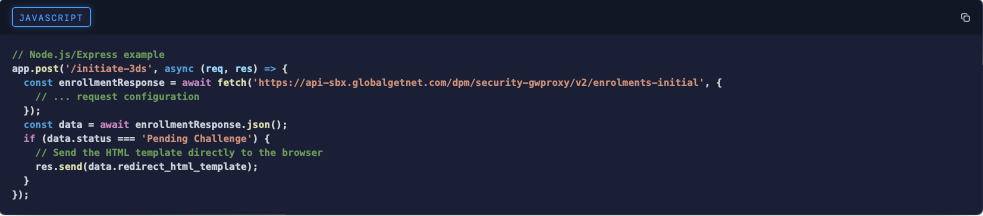
Extract and render the
redirect_html_template directly in your application. The template contains a self-submitting form that automatically redirects the customer to their bank's authentication page.Example — rendering the HTML template on the client side:

Example — rendering the HTML template on the server side:
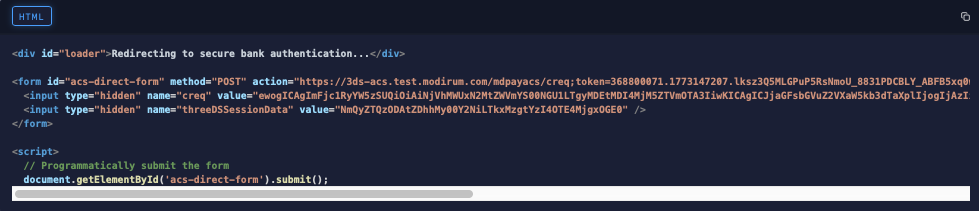
Option B: ACS Direct Form
Use the
acs_redirect_form object to perform a manual POST request from the customer's browser. This method is preferred because it avoids third-party scripts and allows you to display a custom loading UI during the redirect.Required POST details:
- URL: Use the
action_urlvalue from the response. - Method:
POST - Content-Type:
application/x-www-form-urlencoded - Body: Include
creqandthreeDSSessionData.
Example — manual POST redirection:
Status: Pending Enrollment Continue
Proceed to Step 3C: Continue Enrollment before handling any subsequent status.
Step 3B: Validate Authentication
After the customer completes the challenge and the browser redirects back to your site, capture the CRES token from the callback and call the 3DS - Validate Authentication endpoint. Pass the token along with the
transaction_id and xid from the enrollment response.Request example:

Step 3C: Continue Enrollment
If the initial enrollment returns
Pending Enrollment Continue, call the 3DS - Continue Enrollment endpoint with the transaction_id from Step 2. The response follows the same status logic as the initial enrollment and may return Pending Challenge or Authenticated.If the response returns
Pending Challenge, redirect the customer using Option A or Option B, then call Step 3B: Validate Authentication.Response example (Pending Challenge status):
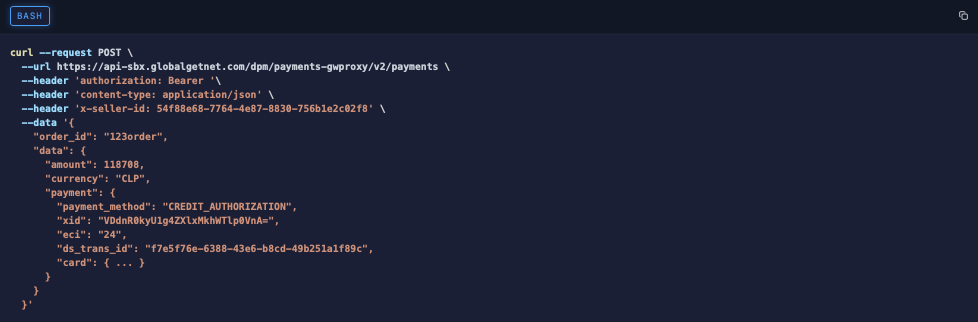
Step 4: Create the Payment
Once authentication completes (
Authenticated or Attempt), call the Create - Authorize endpoint. Include the authentication data (xid, eci, cavv, ds_trans_id) in the payment object.Request example:
Europe Integration
The 3DS flow for the
santander tenant with country: ES follows the same lifecycle as the generic flow, but with specific behaviors at each stage. This section documents the complete linear flow.Key Identifiers
| Field | Value |
|---|---|
| Tenant | santander |
| Country | ES |
| Currency | EUR |
| 3DS Protocol | 2.1.0 |
| ACS Provider | Redsys (sis-d.redsys.es) |
Required Headers
All requests in the Spain flow require the following additional headers:
| Header | Value |
|---|---|
x-seller-id | Your seller UUID |
tenant | santander |
country | ES |
x-operation-type | card |
Step 1: Initiate Enrollment
Call
POST /v2/enrolments-initial with the Spain-specific headers. Include the extra_fields object with customer, billing, shipping, and browser details.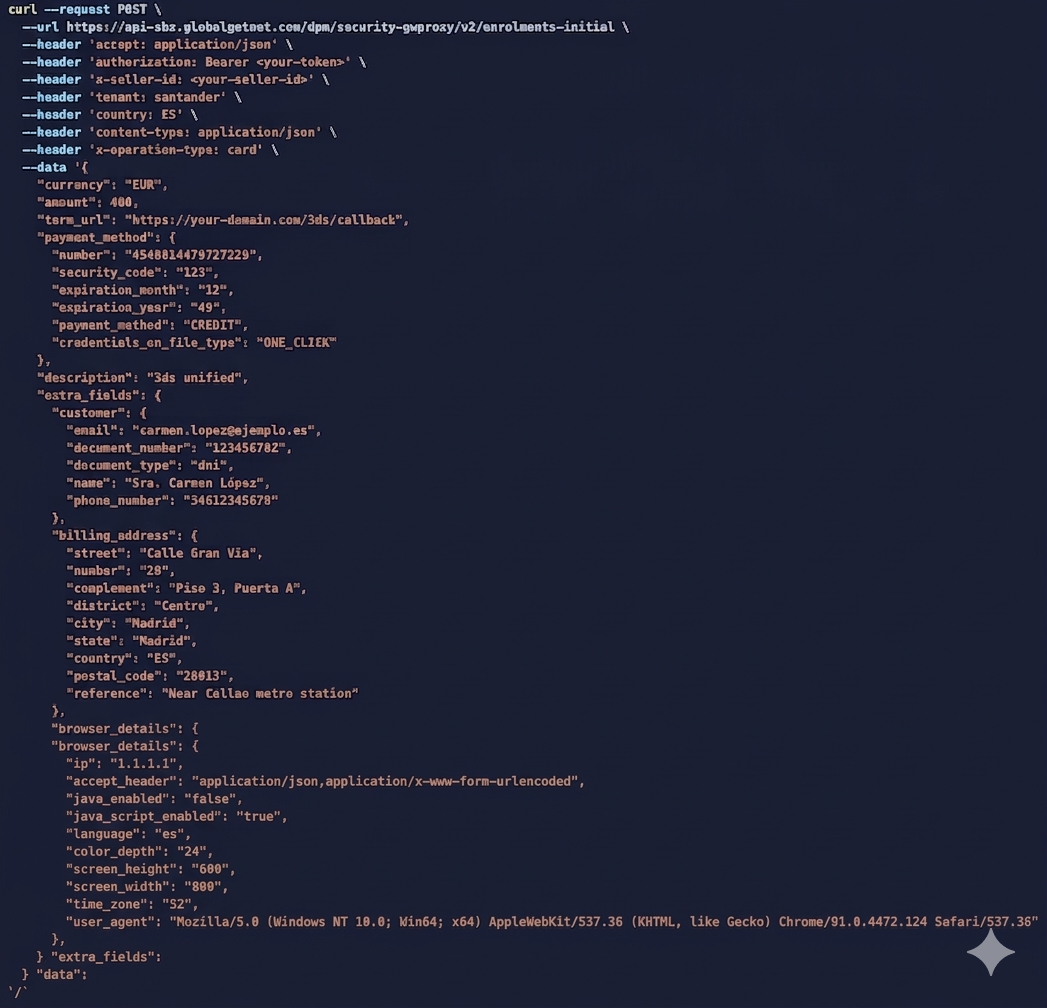
Response example (Attempt):

Important —Attemptstatus in Spain: Always proceed to Step 2 (Continue Enrollment) when you receiveAttempt. Do not treat it as completed authentication. The Continue step may reveal aPending ChallengeorAuthenticatedstate. Store thetransaction_id; you need it for all subsequent steps.Theacs_redirect_form.creqvalue in this response is a server transaction reference used internally for flow continuation. Do not use it to redirect the customer — the actual ACS redirect data is returned in the Continue Enrollment response.
The response may also return
Pending Enrollment Continue or Authenticated directly.Step 2: Continue Enrollment
Send the
transaction_id from Step 1 to POST /v2/enrolments-continue. Include the same Spain-specific headers. The response follows the same status logic as the generic flow and may return Pending Challenge or Authenticated.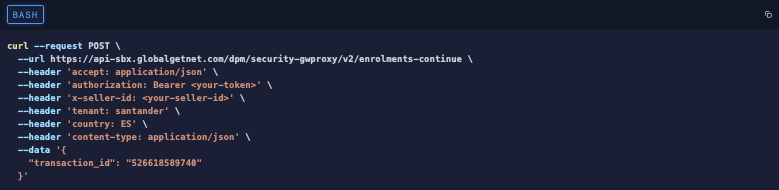
Response example (Pending Challenge):
Redirect the customer to the ACS using either method:
Option A: HTML Template — Inject the
redirect_html_template into your page. The template is a self-submitting form that redirects the customer to the challenge page automatically.Option B: ACS Direct Form — Build a POST form using the
acs_redirect_form data. For Redsys, the form requires only the creq field — do not include threeDSSessionData.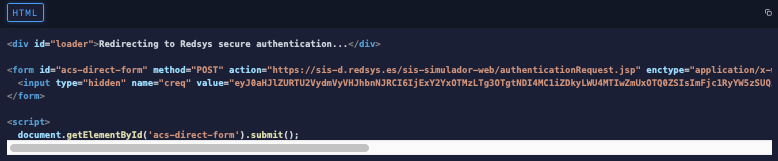
Key difference from the generic flow: The ACS form requires onlycreq. The generic flow requires bothcreqandthreeDSSessionData.
Step 3: Validate Authentication
After the customer completes the challenge, the ACS redirects back to your
term_url with a CRES token. Capture this token and call POST /v2/validations. Pass the CRES in the token field.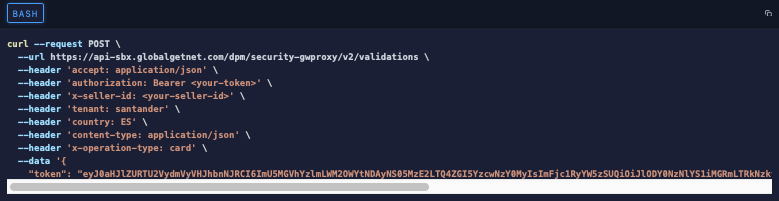
Response example (Authenticated):

Note: The validation response returnstx_id,status, andds_trans_id. It does not include all fields present in the generic response (such asxidorcavv), but the status values follow the same convention.
Step 4: Create the Payment
Once the 3DS flow reaches
Authenticated, call POST /v2/payments to charge the card.Spain-specific requirements:
- Set
order_idto thetransaction_idreturned by the 3DS enrollment process — not a custom order ID. - Include the
cresfield in thepaymentobject. For ES transactions, onlycresis required for 3DS authorization — do not includexid,cavv, oreci.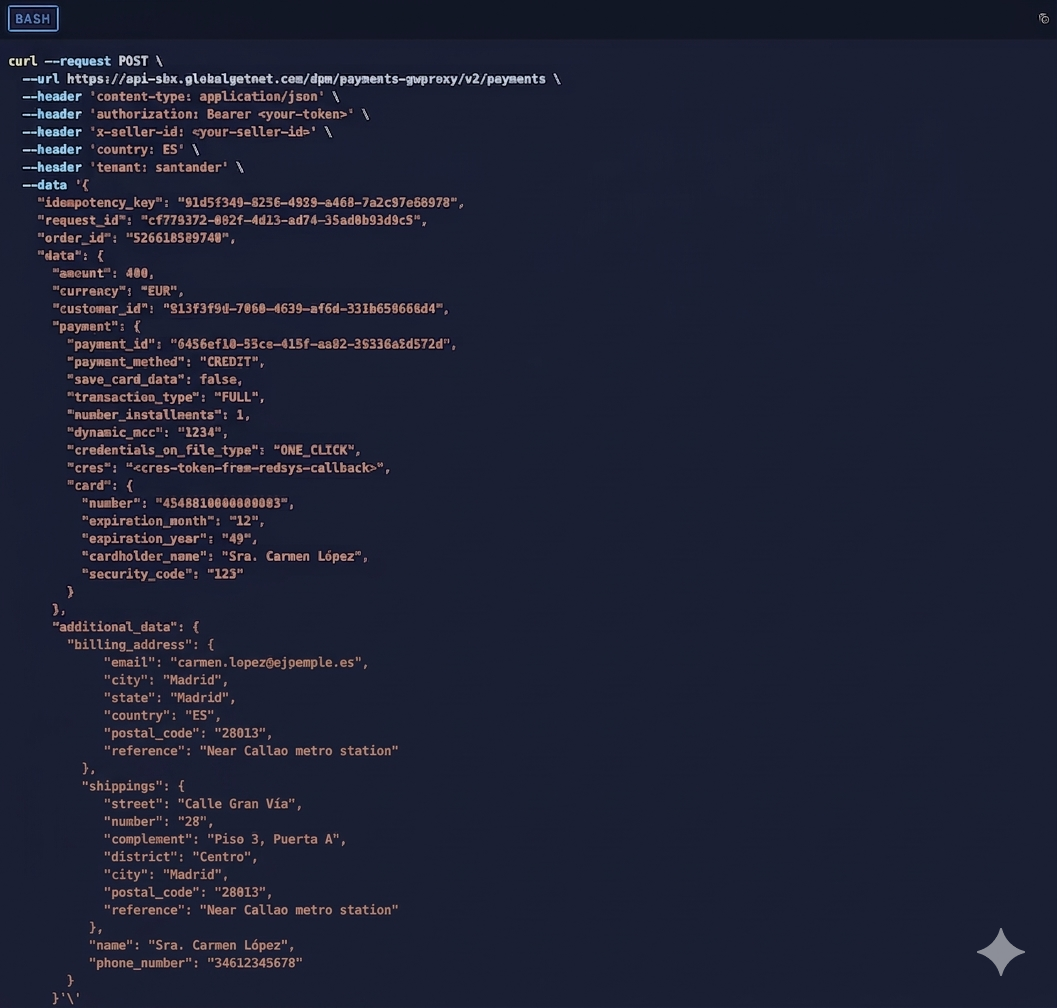
Next Steps
On this page
Create a 3DS Authenticated Payment